I am helping a friend sort out her blog so am practising some techniques here so I can explain.
https://www.blogger.com/blogger.g?blogID=3732715415390730371#editor/target=post;postID=2905988704686122891;onPublishedMenu=posts;onClosedMenu=posts;postNum=0;src=link
Tuesday, April 15, 2014
Tuesday, January 21, 2014
Height????
The next challenge on Off The Rails Scrapbooking http://offtherailsscrapbooking.blogspot.com.au/
involved adding height to a project which severely limited what I could do so I decided on a cake platter of cupcakes.
I cut a 6 x 4 card and then a background piece of lightly decorated paper and then inked the edges of both the card and the background using a gold ink pad.
Next step was to open the new die that I bought from Shelley's Land https://www.facebook.com/groups/486192618129379/ and then to find some silver paper. Fortunately I had some in my old Creative Memories stash. Then I used the Cuttlebug to cut and emboss. I have decided that fleecy fabric works well as shim. A bit odd I know - but hey - if it works....why not?


 I used a mini patty case to cut the paper shells but after I had decided
on the cakes I had to trim them a bit more. I tried both circle and
football punches and decided that the football with trimmed sides made
excellent little cakes.
I used a mini patty case to cut the paper shells but after I had decided
on the cakes I had to trim them a bit more. I tried both circle and
football punches and decided that the football with trimmed sides made
excellent little cakes.

Then it was time to mount the cakes onto the cake stand using raised dots - I had a bit of height. Not a lot I must admit but a bit!!!!!!! Now all I needed was a bit of bling.

involved adding height to a project which severely limited what I could do so I decided on a cake platter of cupcakes.
I cut a 6 x 4 card and then a background piece of lightly decorated paper and then inked the edges of both the card and the background using a gold ink pad.
Next step was to open the new die that I bought from Shelley's Land https://www.facebook.com/groups/486192618129379/ and then to find some silver paper. Fortunately I had some in my old Creative Memories stash. Then I used the Cuttlebug to cut and emboss. I have decided that fleecy fabric works well as shim. A bit odd I know - but hey - if it works....why not?
Doesn't look like it has any height at all - but I am happy and it won't rip in the post.
Tuesday, January 7, 2014
Scrapping along and meeting challenges
This latest challenge from "Scrapbooking Off The Rails" involved a
choice of 4 colours. Most others in the group are hands on paper
scrappers and use lots of embellishments. I have decided to keep going
with my own approach and continuing my digital work as I can do it in
the van and while we travel. Craft supplies take up so much room! I
manage to take card making bits and pieces with me in the van but leave
the paper scrapping to home time.

 I took the 4 colour panel on offer in the guidelines and decided to use
those exact colours as the background paper. Plaiding was my plan.
However it looked somewhat dull and flat so my final step was to use both
the 4 colour panel and the flowers that were included in the challenge.
My background fiddles are shown below.
I took the 4 colour panel on offer in the guidelines and decided to use
those exact colours as the background paper. Plaiding was my plan.
However it looked somewhat dull and flat so my final step was to use both
the 4 colour panel and the flowers that were included in the challenge.
My background fiddles are shown below.
 Next step after I rejected the above arrangement

Still not satisfied so I used the flower strip in both directions to achieve my finished background paper

Then it was time to add the pictures. There were too many to choose from so I ended up with a double page spread. I reversed the background paper on the second page of the spread.


I quite enjoyed revisiting this beautiful part of Australia through my scrapping and now look forward to printing some of these pages and popping them in my album.
Dear me - I reread the instructions and discovered I should have used their sketch as well.

This is where digital scrapbooking comes into its own. I took my final page above - deleted some of the photos - added some more trim, moved the title and then I had my entry!

I took the 4 colour panel on offer in the guidelines and decided to use
those exact colours as the background paper. Plaiding was my plan.
However it looked somewhat dull and flat so my final step was to use both
the 4 colour panel and the flowers that were included in the challenge.
My background fiddles are shown below.
First try at background
Still not satisfied so I used the flower strip in both directions to achieve my finished background paper
Then it was time to add the pictures. There were too many to choose from so I ended up with a double page spread. I reversed the background paper on the second page of the spread.
I quite enjoyed revisiting this beautiful part of Australia through my scrapping and now look forward to printing some of these pages and popping them in my album.
Dear me - I reread the instructions and discovered I should have used their sketch as well.
This is where digital scrapbooking comes into its own. I took my final page above - deleted some of the photos - added some more trim, moved the title and then I had my entry!
Wednesday, December 11, 2013
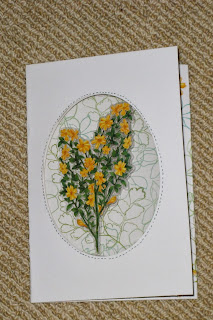
Challenge time - using acetate.
I never thought I would be talking about my scrapbooking on here but I wanted to participate in a challenge with a group I have joined. The challenge is with Off the Rails Scrapbooking
( offtherailsscrapbooking.blogspot.com.au ) and involved using acetate. You need to post via a blog so here we go.
My contribution is a very simple card as I like simple things and sometimes I need something very basic. I used a couple of stickers and placed them between the acetate sheets and then melted them together. My card is a simple 3 fold with the acetate sitting in a cut out oval on the front third. Inside is a stamped pattern in greens. I have not written any words yet as I like to write in my own handwriting to make the message personal. That part is the inner third.
This was difficult to photograph with all the glare from the acetate and the bounce back from the white paper. I have so much to learn but it is such fun!


Thursday, October 24, 2013
A great recipe for shared camping food - doesn't need cooking.
This will interest very few but I have decided to post these recipes on the blog because when I am away I can access what I need. We have get togethers and sometimes you need to prepare dessert style items or goodies for afternoon or morning teas. This one requires no cooking and the items are easily transported. I used only 125 grams of choc bits which meant I could make 2 batches. There was plenty of chocolate.
250gram packet Milk Coffee or Marie biscuits.
1 heaped tablespoon cocoa
150 grams choc bits
395 gram can sweetened condensed milk
1 1/2 cups shredded coconut
Method
1. Finely crush biscuits (I used clip lock bags and a large tin of pie apples) and place in large bowl. Add sifted cocoa, choc bits and condensed milk. Mix well.
2. Shape level teaspoons of mixture into balls and roll in coconut
3. Lay in single layer on plate, cover and refrigerate several hours or overnight until firm.

I found this recipe for apple pikelets in the same useful little magazine
They could be very tasty but I haven't tried them yet.
Method
Whisk first 5 ingredients in a bowl.
Stir in apple
Drop tablespoons of batter into heated greased non stick frypan and cook 2-3 minutes each side.
Serve warm with butter, honey or golden syrup.
Chocolate Coconut Balls
Ingredients250gram packet Milk Coffee or Marie biscuits.
1 heaped tablespoon cocoa
150 grams choc bits
395 gram can sweetened condensed milk
1 1/2 cups shredded coconut
Method
1. Finely crush biscuits (I used clip lock bags and a large tin of pie apples) and place in large bowl. Add sifted cocoa, choc bits and condensed milk. Mix well.
2. Shape level teaspoons of mixture into balls and roll in coconut
3. Lay in single layer on plate, cover and refrigerate several hours or overnight until firm.
****************************************************
Cooking outside the KK
I found this recipe for apple pikelets in the same useful little magazine
They could be very tasty but I haven't tried them yet.
Apple pikelets
Ingredients
1 cup self raising flour
pinch cinnamon
1 cup self raising flour
pinch cinnamon
1 egg
1 tablespoon sugar
3/4 cup milk
1 grated Granny Smith apple.
1 tablespoon sugar
3/4 cup milk
1 grated Granny Smith apple.
Method
Whisk first 5 ingredients in a bowl.
Stir in apple
Drop tablespoons of batter into heated greased non stick frypan and cook 2-3 minutes each side.
Serve warm with butter, honey or golden syrup.
Monday, November 12, 2012
Quiet books.
There are some wonderfully creative people out there in Internet land and I have been browsing the net for ideas for Quiet books. I came upon an excellent blog site and thought I would save it here. I have lots of ideas on my Pinterest board but sometimes I think a list in a blog like this could be more useful.
The site is Imagine our Life
http://www.imagineourlife.com/quiet-book-patterns/
The site is Imagine our Life
http://www.imagineourlife.com/quiet-book-patterns/
Sunday, November 11, 2012
Time to cook again.
Life has been busy lately and we have travelled up and down the NSW coast and into Queensland - our house is a mess and I am frantically washing clothes from our travels. So to divert myself I decided to make a slice using healthy Low GI ingredients.
Some of the Low GI recipes are a bit dull but this one is GOOD!
Chocolate fruit and nut slice.
Olive or canola oil spray
150 g wholemeal self raising flour
2 tablespoons unsweetened cocoa powder
50 g wholegrained rolled oats
30 g desiccated coconut
2 tablespoons unprocessed oat bran
9 g sucralose or 60 g soft brown sugar
60 g chopped dried fruit
60 gm walnuts (I used chopped almonds)
90 g reduced fat canola oil margarine (just melted)
1 tablespoon pure maple syrup
250 ml low fat milk.
Preheat oven to 180 celcius. Spray a 27 x 17 cm shallow baking tin with oil and line the base with baking paper, with the baking paper overhanging the long sides.
Mix flour cocoa, rolled oats, coconut, oat bran, sucralose, fruit and nuts.
Combine the margarine, maple syrup and milk , then add to the flour mixture and stir well until combined.
Spread evenly into the tin.
Bake for 25 minutes, cool in tin and then turn onto wire rack to cool completely.
Serving idea: serve with berries and low fat yoghurt
Now - back to the housework!
Subscribe to:
Posts (Atom)